Dumpper Tidak Bisa Scan Wifi
Tidak semua wifi yang di tambahan proteksi dapat di jebol dengan cara ini, Tapi hanya wifi yang pengaturan WPS sudah diaktifkan. Jadi silahkan dicoba dan presentase dari wifi yang WPS nya sudah diaktifkan dan belum di aktifkan, dan dalam hal ini saya yakin lebih banyak yang sudah diaktifkan. Saya sudah membuktikan, dan sudah mempraktekkan tentunya.
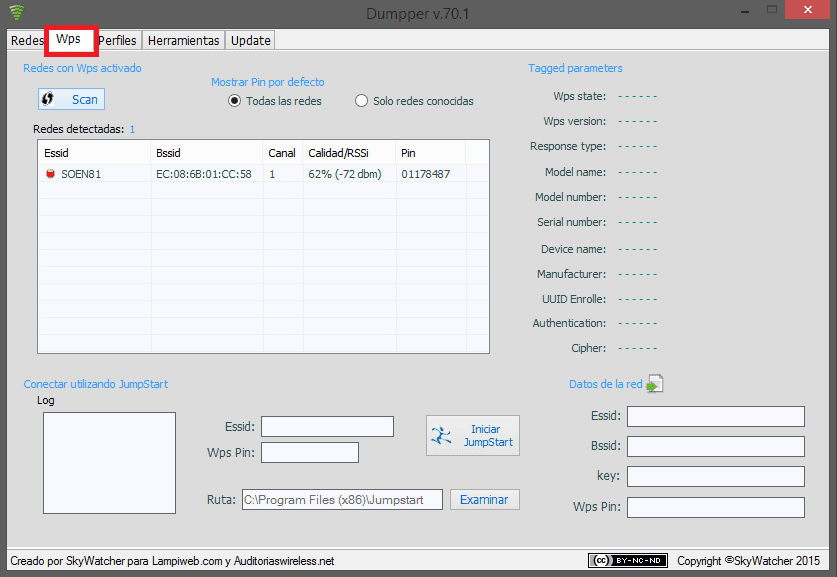
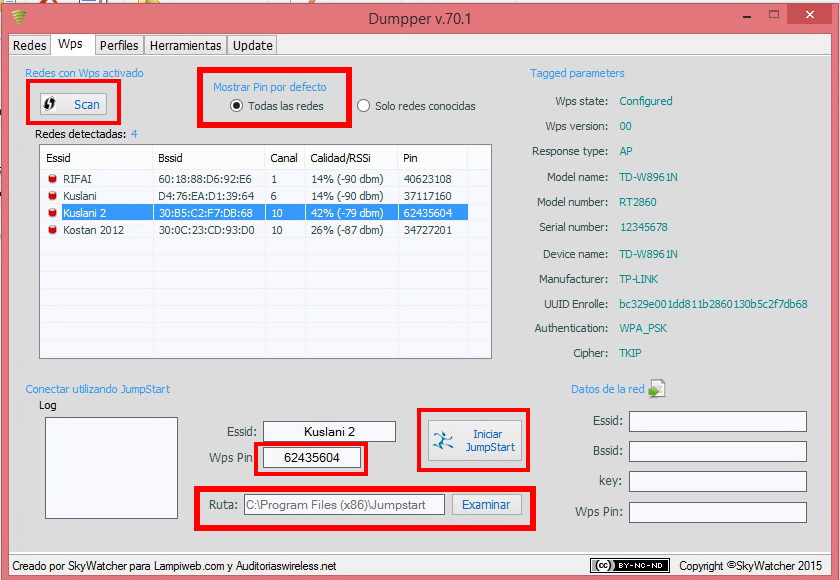
- Klik Scan, nanti Dumpper akan memulai scan dan Kalian bisa melihat daftar WiFi yang tersedia di sana. Seperti Gambar dibawah Ini: Jika sudah ketemu jaringan WiFi target, silakan pindah ke Tab WPS. Seperti Gambar dibawah Ini: Klik pada Todas las redes, lalu pilih nama WiFi yang menjadi target. Selanjutnya klik pada tombol Iniciar JumpStart.
- Printer Epson L360 Tidak Bisa Scan Dumpper Tidak Bisa Scan Wifi. • 19 days ago posted on bt,sky,talktalk,ee-brightbox,virginmedia thanks • 5 months ago.
Go ahead and open up The Dumpper Language Pack. This adds a Language tab to Dumpper, so that you don't have to learn Spanish to use it. When you open the language pack, nothing will appear, just wait 10 seconds. Now go ahead and open Dumpper, you will see a blue window and a prompt in Spanish. Close the prompt, click the 'Language' tab at the top of the program, and click on your language of choice. Then go back to the first tab, select your wireless adapter of choice from the drop-down box, and press the Scan button. If only one or two networks come up in the blue box at first, click the scan button again until you see all of your Wi-Fi networks in range. Then click the 'WPS' tab at the top of the screen. You will see a second scan button near the bottom of the screen, click it until you see a network you would like to hack. Make sure that the 'Wps version' on the right list says '00' next to it, or else this method may not work. Once you find a suitable target, proceed to the next step.

Step By Step Guide To Using WinPcap, Dumpper, And JumpStart To Penetrate A Wireless Network And Get The Password. (Related to previous post on this sub which will be linked)

This post is related to the post that was just recently on this subreddit:. The video was hard to understand for many users, so I've decided to clear it up with a step by step guide. You can read this and watch the video without the audio to see what is being done.
INSTRUCTIONS
This tutorial can be found here or in the link to /u/noobdan s post above. The video is hard to understand, so I'll try my best to list each step in detail. Here are downloads for the things you'll need:
Dumpper: http://sourceforge.net/projects/dumpper/ (I realized this version was in Spanish and didn't have the option to switch languages, so I found an English translated version here or here.)
WinPcap: https://mega.co.nz/#!0BECXZhL!V5fomyh0yyrCbxbscs13L3iN3bCOrb0ZyUkEIiYJ_xw
JumpStart: https://mega.co.nz/#!cBUEFagB!H1W75x9LRJQwH4fwf4EjHbFdbcMUxdW2JxWNKOLk-I4
Kenapa Printer Hp Tidak Bisa Scan
NOTE: You need to have Microsoft .NET Framework installed on your computer as well, or this will not work. You can install Microsoft .NET Framework here.
Disclaimer: I (The creator of the video has already stated this, but I'd like to go over it again) do not take any responsibility for your actions regarding this tutorial. This was made by the creator to demonstrate weaknesses in wireless networks and for educational purposes only. Breaching other people's wireless networks without permission is against the law. If you want to test this tutorial, try it on your own home network.
without a password, then you can get the password from inside the network. I'll show you how towards the end of the tutorial. First, download all of the programs above. Now, follow these instructions for setting it up:
Download and install JumpStart, WinPcap, and Dumpper
Open Dumpper. It'll be in Spanish, so go to the far right tab and select 'English' in between the other two options.
Your programs are set up and ready to go, now begin the process:
In the 'Networks' tab, select the network adapter you wish to use. Hit the 'Scan' button now.
After it completes the scan, go over to the 'Wps' tab. In the area that says 'Connect using JumpStart', hit 'Browse' to select the location of where you installed JumpStart in the previous set-up steps. (By default, it installs in C:Program Files (x86)Jumpstart. Don't open it, just select the 'Jumpstart' folder and click 'OK')
In the area 'Show default pin', select 'All networks' isntead of 'Only known networks'.
Hit the 'Scan' button.
Select the network you wish to penetrate. Remember the 'Pin' corresponding to your network in the scan results, this will be needed for later.
In the previous area 'Connect using Jumpstart', hit the 'Start JumpStart' button.
Under 'What do you want to do?', select 'Join a wireless network' and hit 'Next'
Under 'Which setup method do you want to use?', select 'Enter the PIN from my access point' and enter the PIN next to your network in the scan section back in the previous scan results.
Finally, select the targeted network from before and hit 'Next'.
Now you're happily connected to that WiFi network you just penetrated. Do you want to see the password so you can get on from other devices without doing this process? Sure! Follow these simple steps:
Open the menu where you join WiFi networks/view the network you're connected to.
Right click on the network you just joined and hit 'Properties'
Under the 'Security' tab, you can see the password, but it's just dots. Check the 'Show characters' box under it.
The password will then reveal itself.
Done
EDIT: Some formatting to make it easier to read